
To make a pinecone wreath with natural texture, clean and dry open pinecones, wire them in overlapping rings around a sturdy wreath form, fill gaps with small pinecones and greenery, add a bow if you like, then hang the wreath from a hook rated for its weight.
The look comes from mixing pinecone sizes, shapes, and tones rather than using identical pieces. Large pinecones set the outer shape, medium pinecones fill the middle, and small pinecones and dried greenery soften the edges. Work in rings, step back often to check fullness, and leave the center opening clear so the wreath reads as a ring from across the room or the porch. For ideas on where a finished wreath fits outside, see these exterior decorating ideas for fall and these fall porch ideas.
Key Takeaways
- Use open, dry pinecones in several sizes, since mixed sizes give a fuller and more natural look than one uniform size.
- Wire pinecones to the form instead of relying only on glue, so the wreath holds its shape and survives handling and hanging.
- Build in rings from the outside in, overlapping each pinecone slightly, and check the wreath from the front and the side as you go.
- Fill gaps with small pinecones, moss, dried leaves, or evergreen sprigs rather than adding one more large pinecone on top.
- Keep the wreath balanced by spreading colors and textures around the ring, not clustering all the dark or light pinecones in one spot.
- Hang the wreath from its form, not from a single pinecone, and store it in a box where it will not be crushed.
Materials and Supplies
- 40 to 60 open pinecones in mixed sizes, depending on the wreath form size
- A sturdy wreath form, such as a wire frame, grapevine form, or foam form wrapped in ribbon or fabric
- Floral wire, plus wire cutters and pliers
- A hot glue gun and glue sticks, for small filler pieces only
- Work gloves, since pinecone scales can be sharp and sap can be sticky
- An old sheet or tray to catch scales and debris
- Dried greenery, moss, dried leaves, or small twigs for filling gaps
- Ribbon for a bow and a hanging loop, if you want them
- Pruning shears or strong scissors for trimming greenery
- A wreath hook or nail rated for the finished wreath weight
1. Choose Pinecones and Plan the Wreath Size

Start with pinecones that are open, dry, and firm, with scales that spread outward rather than lying flat and tight. Open pinecones sit well on a wreath form and show the layered texture that gives this project its look. Set aside any pinecones that are soft, moldy, cracked through the center, or missing large patches of scales, since they will not hold wire well and may shed.
Decide the finished size before you start wiring. A wreath form of about 12 to 18 inches across suits most front doors, mantels, and interior walls, while a smaller form suits a narrow door, a window, or a table centerpiece. Count your pinecones against the form size: a larger form needs more pinecones, and running short halfway through a ring makes it hard to match sizes later. Lay the form on a table and set pinecones around it in a loose ring to check that you have enough before you wire anything.
2. Clean and Dry the Pinecones
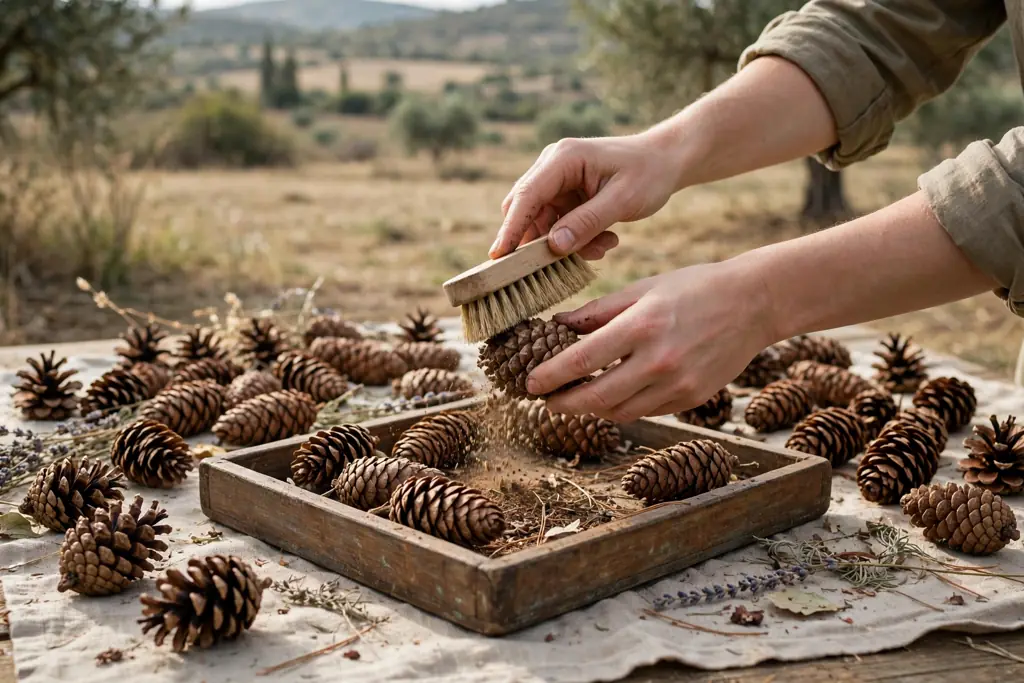
Shake each pinecone gently over a tray to remove loose dirt, seeds, and debris, then brush the scales lightly with a dry brush or an old toothbrush. If pinecones gathered outdoors look dusty, rinse them briefly in water and let them drain upside down on a towel. Do not soak them for a long time, since soaked pinecones close up and take much longer to dry.
Dry the pinecones fully before you build. Spread them in a single layer on a tray in a warm, dry spot with air moving around them, and turn them once a day until they feel dry and the scales have opened again. Drying time varies with pinecone size and room humidity, so check by touch rather than by the clock. Building with damp pinecones can lead to a musty smell indoors and to glue or wire that loosens as the pinecones shrink while drying.
3. Choose a Base and Add a Hanging Loop

Pick a form that matches how and where the wreath will hang. A wire frame is light, strong, and easy to wire pinecones to, and it suits a full pinecone wreath that will hang on a door. A grapevine form already has a natural look and suits a looser wreath with greenery showing between pinecones. A foam form works well if you plan to glue many small pieces, but wrap it first in ribbon, fabric, or twine so the foam does not show through gaps.
Add the hanging loop before you add pinecones, while the back of the form is still easy to reach. Loop floral wire or sturdy ribbon through the top of the form, twist or knot it firmly, and test it by holding the empty form up by the loop. A loop fixed at this stage sits behind the pinecones and stays hidden, while a loop added at the end often ends up tied to a single pinecone that can pull loose.
4. Sort Pinecones by Size and Tone
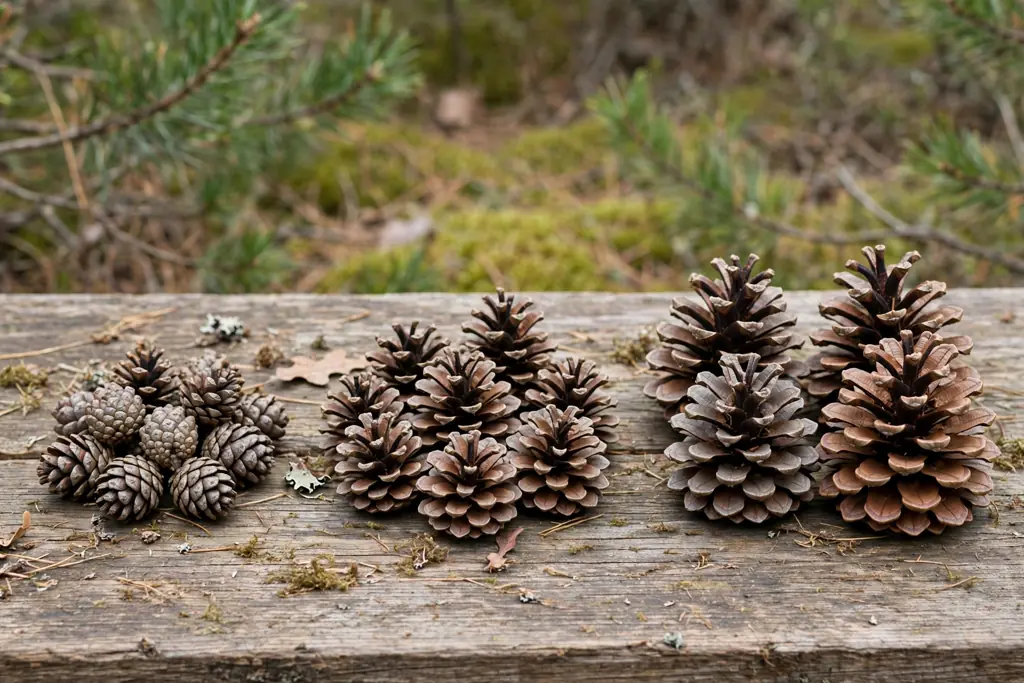
Sort the dry pinecones into three groups: large, medium, and small. Large pinecones will form the outer ring and set the wreath width. Medium pinecones will fill the middle and inner rings. Small pinecones will fill gaps and soften the edges at the end. Sorting first saves time during wiring, since you will not have to hunt for the right size while holding wire in one hand.
Within each size group, notice the tones. Some pinecones are warm brown, some are gray brown, and some have pale tips on the scales. Spread the tones around the wreath as you work, placing a dark pinecone, then a lighter one, then a mid tone one, so no quarter of the wreath looks much darker or lighter than the rest. Keep a few spare pinecones of each size aside for filling gaps in step 10, rather than using every pinecone in the first rings.
5. Attach the First Outer Ring
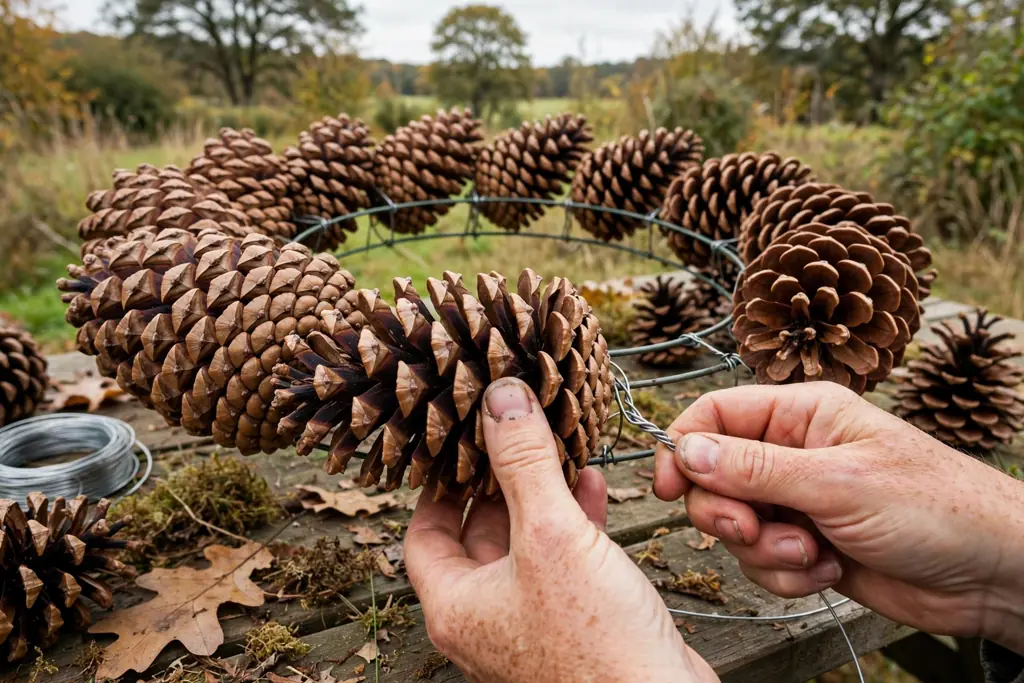
Start the outer ring by wiring large pinecones around the outside edge of the form, with each pinecone facing outward and slightly forward. To wire a pinecone, wrap floral wire around its base, between the lower scales, twist the wire ends together at the back, and then wrap those ends around the form and twist again until the pinecone sits firm. Tug each pinecone gently after wiring; if it wobbles, add a second wrap of wire before moving on.
Overlap each new pinecone slightly over the last one, so the scales layer like roof tiles and the form does not show through. Keep the pinecones at a similar depth from the front of the form, so the outer edge reads as one even ring rather than a bumpy line. Work all the way around the form before you start the next ring, and step back to check the shape from a few feet away.
6. Fill the Middle and Inner Rings
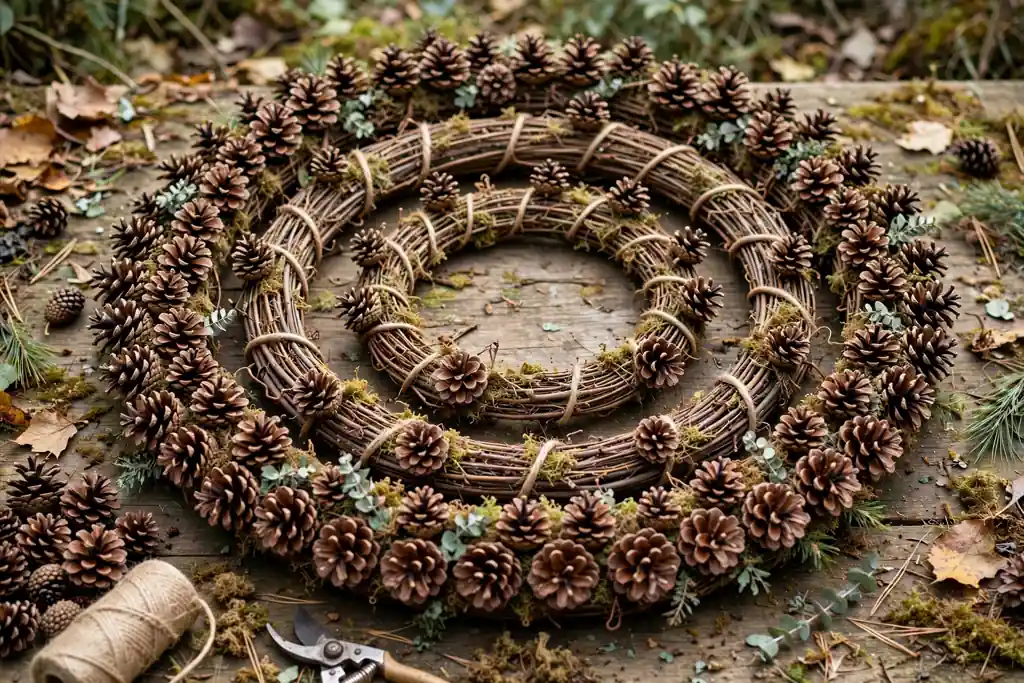
Add a second ring of medium pinecones just inside the outer ring, again facing forward and overlapping slightly. This ring should sit a little higher than the outer ring, so the wreath gains depth from the outside toward the center. Wire each pinecone to the form in the same way, and tuck the wire ends behind the form so they do not catch on a door or a wall.
Add a third, inner ring of medium and small pinecones around the center opening, keeping that opening clear and round. The inner ring frames the hole in the middle of the wreath, which is what makes the shape read as a wreath rather than a solid disc. Check the center opening as you go, and move a pinecone that leans too far inward, since a blocked center opening makes the wreath look crowded.
7. Add Greenery and Filler for Natural Texture

Once the pinecone rings are in place, fill the gaps with dried greenery, moss, dried leaves, or small twigs. Tuck a short sprig of evergreen, dried fern, or eucalyptus between pinecones where the form still shows, and fix it with a dot of hot glue or a short wire wrap. Greenery softens the hard lines of the pinecones and adds the layered, natural texture that plain pinecone rings can lack.
Use filler sparingly and spread it around the whole wreath. A few sprigs in each quarter of the ring look planned, while a large clump of greenery in one spot can hide the pinecones and unbalance the shape. Step back after each round of filler and look for bare patches of form, then fill only those patches. If a sprig sticks out too far, trim it with shears rather than bending it, since bent greenery often springs back out of place.
8. Add Small Accents Without Crowding the Wreath

Small accents, such as dried seed heads, cinnamon sticks, small dried orange slices, or a few berries, can add color and scent, but only if they stay small and few. Choose one or two accent types at most, and repeat them in small groups around the wreath rather than covering it with many different items. Three small groups, spaced evenly, usually read better than accents scattered at random.
Fix each accent with wire or hot glue to a pinecone or to the form, not to loose greenery that may fall off. Keep accents low and close to the pinecone surface, so they do not catch on a door frame or a coat when the wreath hangs on a door. If you plan to use the wreath outdoors, skip accents that soften in rain, and keep the wreath under a covered porch where it stays drier.
9. Add a Bow and Check the Balance

If you want a bow, make it from ribbon that suits the setting, such as burlap for a rustic porch, plaid for a fall entry, or plain linen for a quiet interior wall. Wire the bow to the form at the top or the bottom of the wreath, not to a single pinecone, and spread the loops so the bow sits flat against the pinecones. A bow wired to the form stays in place when the wreath is lifted, while a glued bow can pull a pinecone loose.
With the bow in place, hang the wreath on a hook at eye level and check the balance from a few feet away. Look for a heavy side, a bare patch, or a cluster of one tone that draws the eye. Move or add a small pinecone or a sprig of filler to fix a bare patch, and trim any pinecone scale or twig that sticks out much farther than its neighbors. Small fixes at this stage make a larger difference than they seem, since the eye catches imbalance most clearly once the wreath hangs upright.
10. Secure Loose Pieces and Trim Stray Scales

Turn the wreath over and check the back for loose wire ends, then bend each wire end flat against the form or trim it short with pliers. Loose wire ends can scratch a door or a wall, snag fabric, and catch fingers when the wreath is lifted on and off its hook. Check the front again for any pinecone that still wobbles, and add a second wire wrap or a dot of hot glue at its base.
Trim broken scale tips, long twigs, and stray greenery that stick out beyond the wreath outline, but keep the natural uneven edge of the pinecones themselves. The goal is a tidy outline with a natural surface, not a perfectly smooth circle. Shake the wreath gently over a tray one last time, and brush off loose scales, so the finished wreath does not shed on a mantel or a porch floor.
11. Hang the Wreath and Adjust Its Position

Hang the wreath from the loop you fixed in step 3, using a wreath hook, a nail, or an over door hook rated for the finished weight. A pinecone wreath is heavier than a plain greenery wreath of the same size, so check the weight by holding it on a scale if you are unsure, and do not hang it from a hook meant for light decor. Set the wreath at eye level on a wall, or centered on the door so it does not cover the handle, the lock, or a door viewer.
Stand back and check the position from across the room or from the yard. Adjust the loop length in small steps until the wreath sits level and centered, and check that a door with a wreath still opens and closes without the wreath catching on the frame. On a front door, check the wreath in wind as well, since a heavy wreath that swings can mark paint; a second short tie from the form to the hook can stop swinging on an exposed door.
12. Store and Refresh the Wreath for Next Season
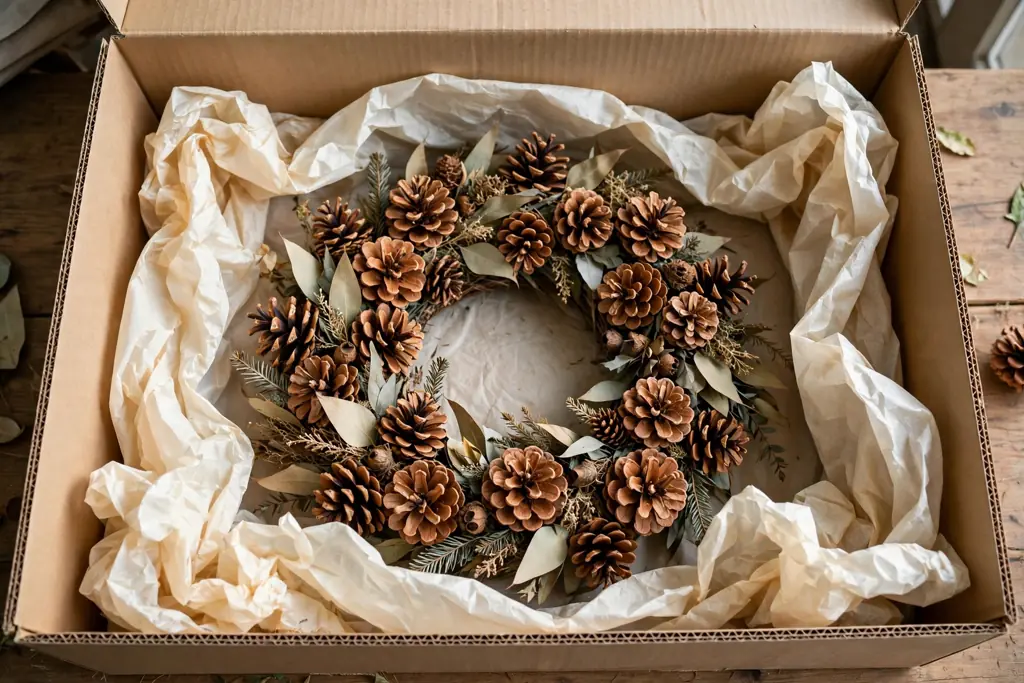
At the end of the season, take the wreath down on a dry day and brush off dust and loose scales before storing it. Store it flat in a box or a wreath bag that is slightly larger than the wreath, with tissue paper tucked around the edges so pinecones do not rub against the box. Do not stack heavy items on top of the box, since crushed pinecone scales do not spring back.
Check the wreath before you hang it again next season. Tighten any wire that has loosened, replace a pinecone that has broken, and add a fresh sprig of greenery where the old filler looks tired. A pinecone wreath stored well can last several seasons, and a short refresh each year keeps it looking intentional rather than worn. Keep the wreath indoors or under cover when it is not in use, since long exposure to rain and sun fades tones and weakens glue.
Conclusion
A pinecone wreath with natural texture comes from patient layering, not from rare materials. Clean, dry pinecones in mixed sizes, wired in rings around a firm form, filled with a little greenery, and hung from a loop fixed to the form itself, give a wreath that looks gathered and holds its shape. Take time to sort, check balance as you go, and store the wreath with care, and the same wreath can return to the door or the wall for seasons to come.
Frequently Asked Questions
How many pinecones do I need for a pinecone wreath?
You need about 40 to 60 open pinecones for a wreath form of 12 to 18 inches across, depending on pinecone size and how full you want the wreath. Large pinecones cover more of the form, so a wreath made mostly of large pinecones needs fewer pieces, while a wreath made of small pinecones needs more. Count your pinecones before you start, and keep a few spares aside for filling gaps at the end.
Should I glue or wire pinecones to a wreath form?
Wire pinecones to the form for the main rings, and use glue only for small filler pieces. Wired pinecones hold firm when the wreath is lifted, hung, and stored, while glue alone can fail under the weight of a large pinecone, especially in heat or damp air. Wrap wire around the pinecone base and around the form, twist it firm, and tug each pinecone to check it before moving on.
How do I clean pinecones before making a wreath?
Shake pinecones over a tray to remove dirt and seeds, brush the scales lightly, and rinse briefly only if they look dusty. Dry them fully in a single layer in a warm, dry spot with air moving around them, turning them once a day until they feel dry and the scales have opened again. Do not build with damp pinecones, since they can smell musty indoors and loosen as they dry.
Can a pinecone wreath hang outside on a front door?
Yes, a pinecone wreath can hang outside, but it lasts longest under a covered porch or entry where rain does not fall directly on it. Hang it from a hook rated for its weight, keep it clear of the handle and lock, and bring it inside during heavy storms. Skip accents that soften in rain, and check the wire and loop each season before hanging it again.
Why does my pinecone wreath look flat or bare in spots?
A flat or bare look usually comes from using one pinecone size, leaving the form showing between rings, or clustering all the filler in one place. Fix it by adding a second ring at a slightly different depth, filling gaps with small pinecones and greenery spread around the whole ring, and checking the wreath upright from a few feet away. Small filler pieces in each quarter of the ring fill bare patches without hiding the pinecones.
How do I store a pinecone wreath so it lasts?
Store a pinecone wreath flat in a box or bag slightly larger than the wreath, with tissue paper around the edges, and do not stack heavy items on top. Brush off dust before storing, keep the box in a dry indoor spot, and check the wire and pinecones before hanging the wreath again. Replace broken pinecones and tired filler each season, and the wreath can last several seasons.